TrueNas - Replace a working disk with a larger one
One of the best features of TrueNas, and really ZFS in general, is the ability to grow your vdevs, and ultimately, grow your pools. In my media server, i currently have the following topology; one pool with one mirrored vdev.


Now you should see a resilvering operation occurring. This will copy the data from the mirrored disk to the new disk, and once done your new drive is ready and participating in the vdev!

- Pool (Media)
- 8TB Disk1
- 8TB Disk2
I recently found a good deal on 16TB disks online and decided i want to replace the existing 8TB disks in my vdev and repurpose them elsewhere. Doing this in ZFS would usually involve taking the disk offline, putting the new (larger) disk in the system, and replacing the offlined disk with the larger one. ZFS will resilver the new disk with all of the data in the mirror and off you go.
The process is pretty similar in TrueNas, but hey, now there's a GUI and it handles all of the messy ZFS commands for you.
Replacing The Disk
First things first, log into your TrueNas system. Navigate to Storage > Manage Devices
- Next select the disk you intend to replace. On the right, scroll all the way down to Disk Info. Mark down the serial number (for removal from your system later) and click Replace
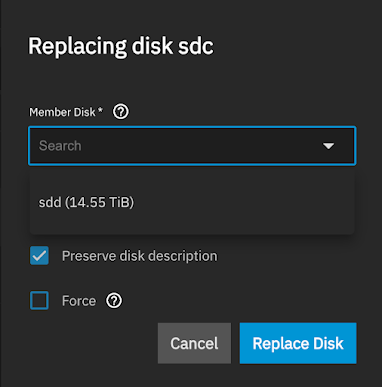
- From here, select the disk you wish to replace it with, and click Replace Disk
Select Storage on the left, scroll all the way down to ZFS status, and you can track your resilvering progress.
Next Steps
Once the resilver progress reaches 100% on the first disk removal, repeat the same steps above to replace the other drive in the mirror with a larger equivalent.
After both drives in the mirror have been replaced, they can be removed from the system after powering off.

Comments
Post a Comment